Configuring FastSpring Contextual Store Integration
This topic is a guide on how to configure to configure the integration between a FastSpring contextual store and SOLO Server. This can be used as an alternative to SOLO Server's integrated shopping cart. Read our blog post on choosing an eCommerce system for more information.
This topic makes several assumptions:
- You already have a SOLO Server license or an activated SOLO Server account (you can sign-up for free).
- You already have a basic working knowledge of SOLO Server's administrative interface.
- You already have the relevant Product(s) and Option(s) configured in SOLO Server.
- You already have a FastSpring account.
- You already have a basic working knowledge of the FastSpring Dashboard interface.
- You already have the relevant Product(s) configured in FastSpring.
One important concept to understand is SOLO Server's FastSpring Integration Script. This is a script included with SOLO Server that is designed to receive automated notifications from FastSpring and respond accordingly.
When adding the FastSpring notification parameters as directed in the steps in the sections below, take care to ensure that there are no spaces after copying and pasting from this topic. For example, this can be problematic if our server receives swk_action =NewLicense instead of swk_action=NewLicense.
Product Option Configurations for Recurring Subscriptions
Recurring subscriptions can be enforced based on two different fields:
- License Status Field
- License Download Until date in SOLO Server
In FastSpring, a subscription is considered valid until the customer stops paying, and then a web hook event will set the License Status field to Expired in SOLO Server. The next time your software validates with SOLO Server, it will see this updated status, and disable use of your software. In this case, the license does not need to have a set expiration date.
Additionally, you can optionally set an initial expiration date for the license based on the Product Option Days to D/L field. For example, an annual license would have a value of 365. Each time the subscription is renewed in FastSpring, the Download Until date of the license will be incremented by the Days to D/L amount. Your software will still need to periodically Refresh with SOLO Server to get this updated date. When using this approach, the subscription charge date in FastSpring may get out of sync with the Download Until date. If you allow the customer to make an overdue payment, these settings can be configured in FastSpring under Subscription Plans: Notifications and Retentions settings:
- Payment Reminders
- Overdue Notifications
- Deactivation Settings
Gather SOLO Server Information
Before you can begin, there is a little bit of information you need to gather from SOLO Server's authors administration interface. Sign-in to SOLO Server, and find the following information:
- On the bottom of the screen, you will find your Author ID to the right of your company name. Take note of this.
- Click the Configure / Products menu, and click "Show options..." next to the product you wish to configure in FastSpring. Take note of the Option ID that corresponds with the product you are configuring in FastSpring.
- You will need the URL of the FastSpring Integration fulfillment script for each new license notification you configure in FastSpring. To obtain this URL, click the Store / FastSpring Options menu, where this URL is listed as the Fulfillment URL.
- You will need the URL of the FastSpring Integration Web Hook script for each WebHook notification you configure in FastSpring. To obtain this URL, click the Store / FastSpring Options menu, where this URL is listed as the Web Hook URL.
Configuring Order Fulfillment
The first step is to configure FastSpring to ask SOLO Server to create a license as part of an order's fulfillment.
Before you can begin, you must have the product configured in FastSpring, and you must have at least one product and product option configured in SOLO Server. Take note of the Product Option ID from SOLO Server (which you can find by clicking Configure / Products, clicking "Show Options..." for the product, and taking note of the Option ID).
Here are the steps to create the license fulfillment in FastSpring:
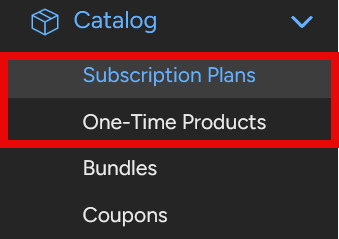
- In the FastSpring menu, use the Catalog menu on the left and select a Subscription Plan or One-Time Product.

- Use the + Create Subscription or + Create Product buttons to create a new item, or you can select an existing item you already created.
- In the Fulfillment section, press the "Add Fulfillment" button.

- Select Generate a License, then pick Remote Server Request from the “Choose a Generator…” dropdown. Select Next.
- Update the following fields:
- URL: Enter the Fulfillment URL from SOLO Server under the Store / FastSpring Options menu.
- Method: HTTP POST (it is already set to this by default)
- POST Encoding: ISO-8859-1
- Output Format: Either of the following two options:
- Single-Line License (Quantity Based) - Displays the ordered license on a single line when an order is completed. This requires the "FastSpring Multi-line License Response" setting under Store / FastSpring Options to be unchecked, which is the default.
- Multiple-Line License (Quantity Based) - This will give you more control over how the list of License ID(s) and Password(s) is displayed when an order is completed.This also requires the "FastSpring Multi-line License Response" setting under Store / FastSpring Options to be checked.
See the Customizing FastSpring Email / Web Order Notification Text section at the bottom of this topic for examples. - Click the Create button. This will create the Fulfillment and provide access to the other Fulfillment configuration settings.
- Click on the Security tab.
- If this is the first notification you are configuring, take note of or copy the private key.
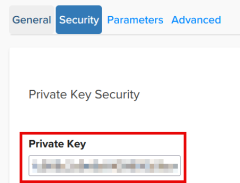
Then go to SOLO Server, click the Store / FastSpring Options menu, click the Edit button, and enter or paste the private key from FastSpring's Security tab into the API Private Key field, and click Submit to save it.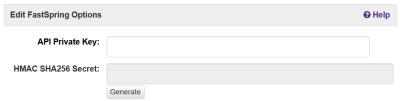
- If this is not the first notification you are configuring, go to SOLO Server, click Store / FastSpring Options, copy the API Private Key value, and paste it into FastSpring's Private Key field.
- If this is the first notification you are configuring, take note of or copy the private key.
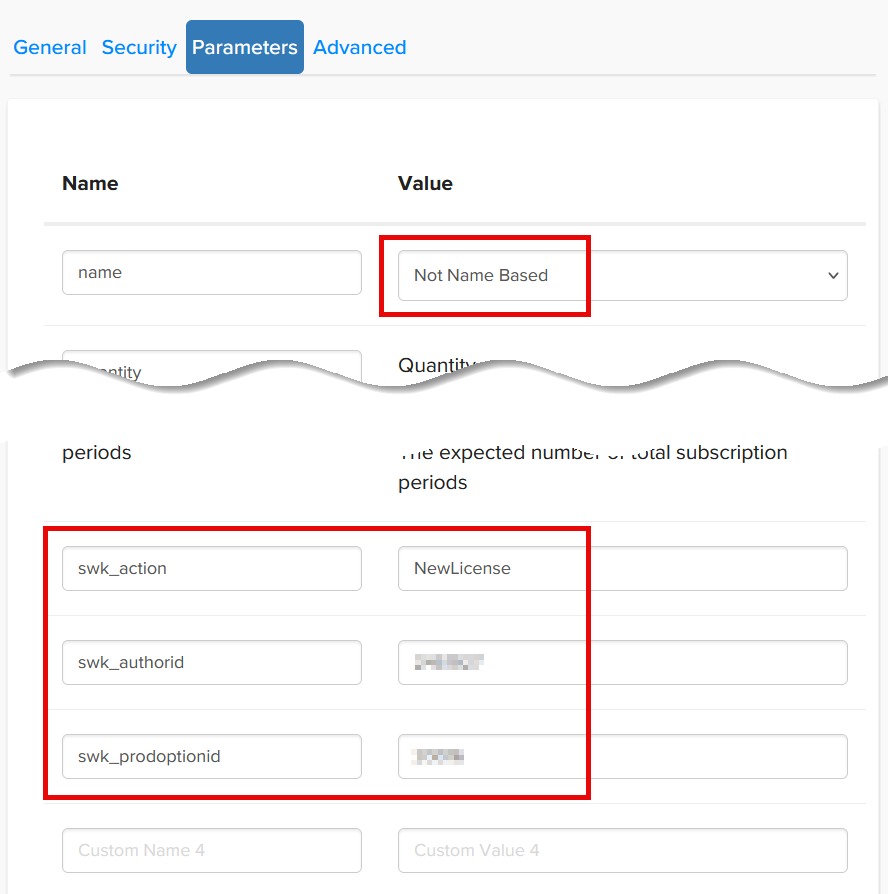
- Click the Parameters tab, and add the following fields to the "Custom" fields at the bottom:
- Add a parameter named swk_action, with a value of NewLicense.
- Add a parameter named swk_authorid, with the Author ID you see at the bottom of SOLO Server's authors administration interface.
- Add a parameter named swk_prodoptionid, with the Product Option ID from the previous section on this page.
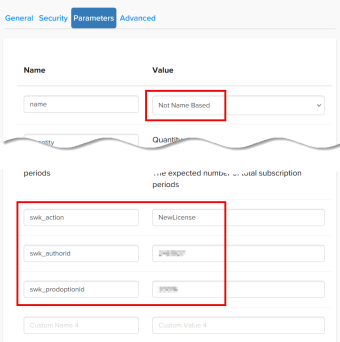
- Also in the Parameters tab, set the name as appropriate. Under most circumstances, you should set this to Not Name Based. Setting this to Person Name will result in the customer name being passed in the notification, which SOLO Server will detect, and when present will populate both the first/last name and company name fields when adding a new customer record. This will allow partially registering the customer information and optionally not configuring the the order.created Web Hook as outlined below.
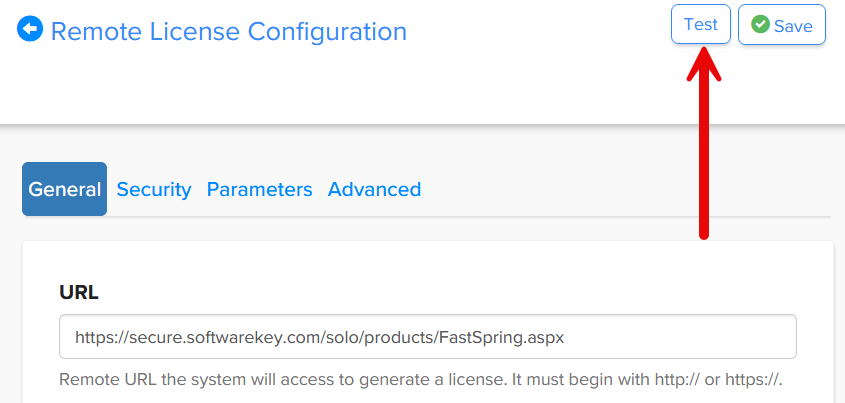
- Click Save on the top-right.
- Back in the Catalog, you should see the license generator in the list in the Fulfillment section. You can click Edit on that item to make changes, and there is a Test button on the top right.

Note that when you run tests, the number of licenses displayed in the results may not match the quantity entered if licenses were previously created for that email address and reference number.


The license generator notifications sent from FastSpring only contain very limited information about the customer, which includes the email address. If a customer with that email address already exists in SOLO Server, it will add the new license to that record. If there isn't an existing customer record, SOLO Server creates a new customer from one of these requests, marks it as unregistered, and only saves the customer's email address for future reference. If you wish to have FastSpring also provide SOLO Server with basic contact details about the customer after an order is completed, follow the steps in the next section.
Configuring Web Hook Integration
After configuring the license generator (as instructed above) for order fulfillment, the next critical piece to configure is the Web Hook integration. Note that Web Hook integration only applies to FastSpring Contextual Stores. If you are using a FastSpring Classic Store, refer to the topic on how to configure integration with that.
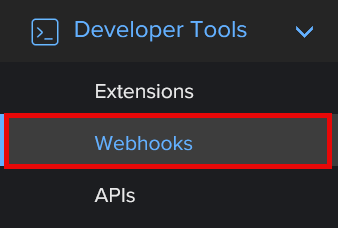
- Sign-in to the FastSpring Dashboard interface, click the Developer Tools menu on the left, and then click the Webhooks sub-menu.

- Click the Configuration tab (next to Log).
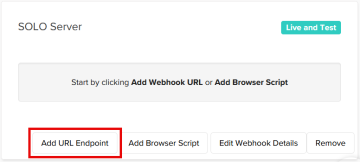
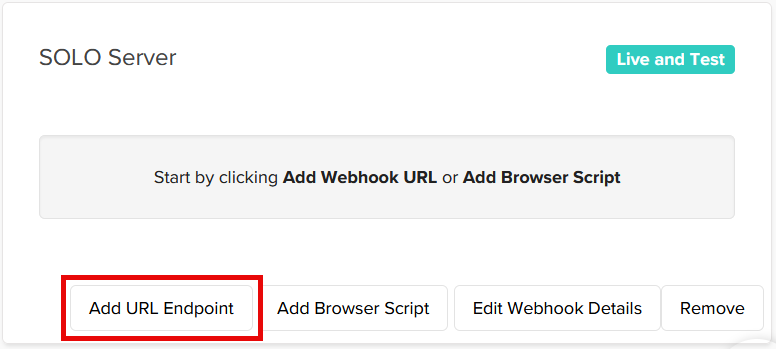
- Click the Add Webhook button on the top right.
- Enter a title such as "SOLO Server", select "Live and Test Orders", and click Add. Do not check the "Enable webhook expansion" checkbox.
- Return to the Configuration tab and click the Add URL Endpoint button under the webhook you just created.
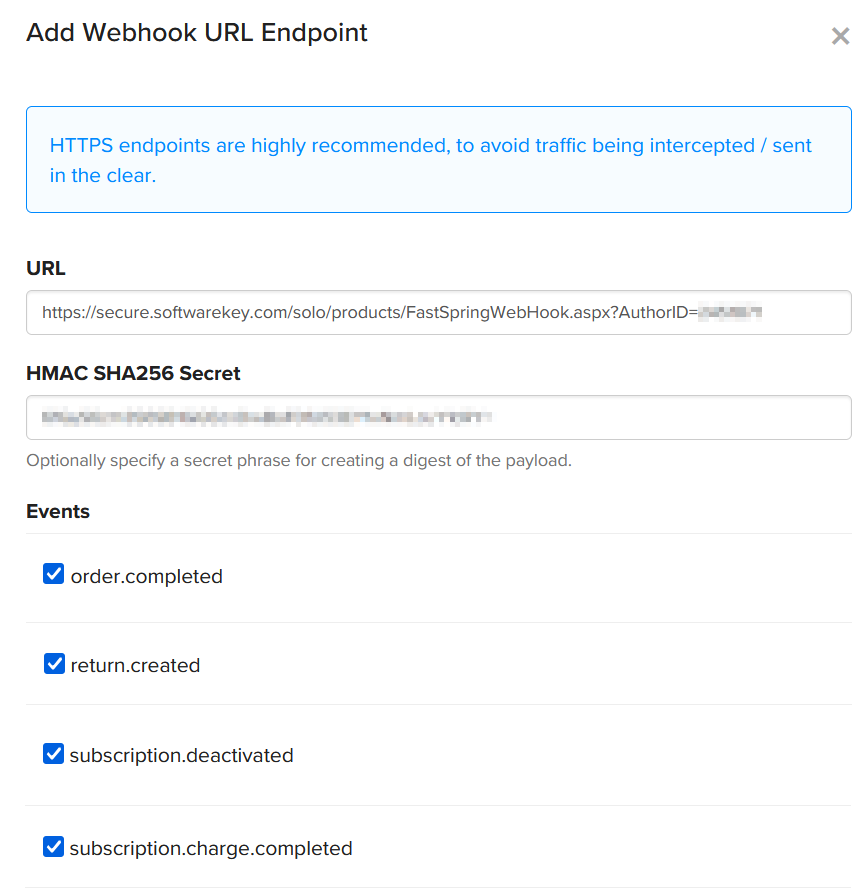
- In another browser tab/window, sign-in to SOLO Server and click the Store / FastSpring Options menu. Then select the URL value listed for Web Hook URL and copy it.
- Paste this URL that you copied from step #6 into the URL field.
- Return to the SOLO Server browser tab/window. If you see a Generate button for the HMAC SHA256 Secret field, click it. Then copy the value in the HMAC SHA256 Secret and paste it into the HMAC SHA256 Secret field in the FastSpring browser tab/window.
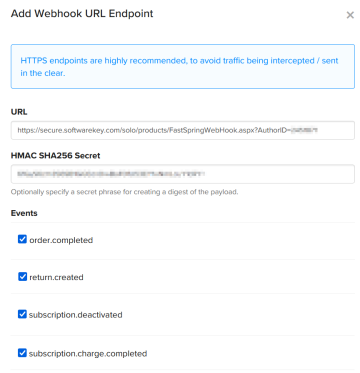
- Next, enable/check the following web hook events as needed:
- order.completed - As noted above, FastSpring only sends very limited information about the customer when generating licenses. If you are using the "Person Name" option for the name parameter for order fulfillment and do not want to collect extended customer information, this is optional. If you want FastSpring to provide SOLO Server with additional information about the customer, it is necessary to do so using by enabling this Web Hook.
- return.created - Enable this Web Hook to have FastSpring notify SOLO Server when an order has been returned. SOLO Server will then send an email notification detailing the return along with details of all licenses that are potentially affected. The nature of returns is not always easily deduced from the data in return.created notifications, which is why the notification SOLO Server sends only informs you of licenses that may require your review and possibly further action from you. You can choose to change the Status of the license in SOLO Server, which will deactivate the software using that license when it validates with SOLO Server.
- subscription.deactivated - Enable this Web Hook to have FastSpring notify SOLO Server when a subscription is deactivated. SOLO Server will then update the license Status field to Expired for all applicable licenses when a subscription is deactivated in FastSpring.
- subscription.charge.completed - Enable this Web Hook to have FastSpring notify SOLO Server when a subscription charge is completed. SOLO Server will then increment the license Download Until date by the Product Option Days to D/L field for all applicable licenses with each successful charge in FastSpring.
- Press Add at the bottom to add the web hook integration with SOLO Server.
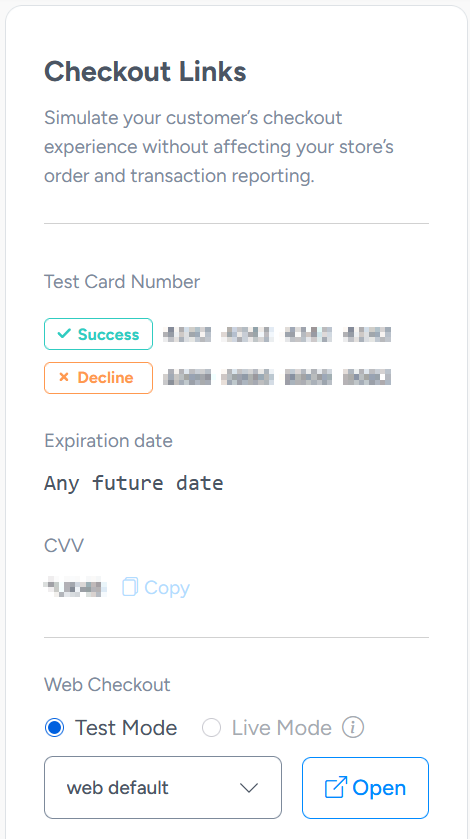
Now that everything is configured, test ordering with each of your products and subscriptions to ensure everything is working correctly. In the Subscription or Product Catalog, you can use the test credit card data and the web checkout option for testing.
Customizing FastSpring Order Email / Web Notification Text
When an order is completed, FastSpring will send the customer an order confirmation email, and SOLO Server can optionally send new customers a welcome email. You can also automatically email the customer their purchased license information, and/or display their license information on the on the order complete web page. This information should include the License ID(s) and Password(s), which the customer will use to activate the software. To configure and customize the notifications:
- In the FastSpring Dashboard interface, go to Products in the menu and select the Product/Subscription you want to configure.
- Under the Fulfillment section, press Add Fulfillment.
- Choose Send Email and press Next. View FastSpring's support page for more information on email / web notifications.
- Once you press Create, additional tabs will be available.
- To configure SOLO Server to send a customer welcome email to new customers, create a Customer Welcome Mailing, and then update the Cart Options and set the Customer Welcome Mailing option to the mailing.
Notification Examples
SOLO Server can only accept Single-Line License (Quantity Based) or Multi-Line License (Quantity Based) notifications, which is determined by the "FastSpring Multi-line License Response" SOLO Server setting under Store / FastSpring Options. You will need to choose one Order Fulfillment output format for all of your products in SpringBoard, either Single-Line License (Quantity Based) or Multi-Line License (Quantity Based).
Choosing Multi-Line License (Quantity Based) gives you more control over how the license information is displayed, which can be especially useful if multiple licenses will be sold in the same order.
Single-Line License (Quantity Based)
When using the Single-Line License (Quantity Based) Order Fulfillment output format, the "FastSpring Multi-line License Response" SOLO Server setting under Store / FastSpring Options needs to be unchecked. The License ID and Activation Password will be listed on separate lines when using #{orderItem.fulfillment.license.licenses.list}. Refer the following examples as a reference, and process a test order and use the Preview option in SpringBoard to check your content is displayed as expected.
Text
Hello #{order.customer.fullName}:
Thank you for your recent order (#{order.id}). You may activate your license(s) with the following information:
#{orderItem.fulfillment.license.licenses.list}
HTML
<div>
<p>Hello #{order.customer.fullName}:</p>
<p>Thank you for your recent order (#{order.id}). You may activate your license(s) with the following information:</p>
<pre>#{orderItem.fulfillment.license.licenses.list}</pre>
</div>
Multi-Line License (Quantity Based)
When using the Multi-Line License (Quantity Based) Order Fulfillment output format, the "FastSpring Multi-line License Response" SOLO Server setting under Store / FastSpring Options needs to be checked. Refer the following examples as a reference, and process a test order and use the Preview option in SpringBoard to check your content is displayed as expected.
Text
Hello #{order.customer.fullName}:
Thank you for your recent order (#{order.id}). You may activate your license(s) with the following information:
#{orderItem.fulfillment.license.licenses.list}
HTML
<div>
<p>Hello #{order.customer.fullName}:</p>
<p>Thank you for your recent order (#{order.id}). You may activate your license(s) with the following information:</p>
<table>
<tr><th>License ID</th><th>Activation Password</th></tr>
<repeat value="#{orderItem.fulfillment.license.licenseData}" var="licenseItem">
<tr><td>#{licenseItem.contentMap.LicenseID}</td><td>#{licenseItem.contentMap.Password}</td></tr>
</repeat>
</table>
</div>